


concernedcitizen
-
Posts
37 -
Joined
-
Last visited
-
Days Won
1
Posts posted by concernedcitizen
-
-
-
-
Seriously, depending how your stats roll you might catch it instantly or not in 40 encounters- and the value is not high enough for that range of variance.
It's extremely frustrating and currently feels haphazardly thrown together in an attempt to be "difficult" without considering the actual user experience.
Sure in base games throwing 40-50 balls to catch a legend is normal- but they generally aren't designed to hard counter catching strats with self heals and gaining stages to all their stats every couple turns.
I'm in a situation now where my main caught the thing in literally 2 balls because of how its stats rolled and using the exact same pokemon my alt can't catch it in over 30 attempts because hp and/or defense IV rolled just slightly lower meaning its either OHKO'd by literally anything or it full heals with giga drain.
Nearly an hour I've wasted for this thing who's value is marginal by comparison, this is a bad design which does nothing for the prestige or value of the catch and only infuriates certain players with unlucky RNG.
-
-
I'm guessing not soon at all because they're making way too much money releasing limited vanities and keeping this game a revolving door for newbies.
-
Damn, six replies and not one can follow the instructions.
-
Welcome to my Beginner's Guide to PokeMMO Christmas Event 2021!
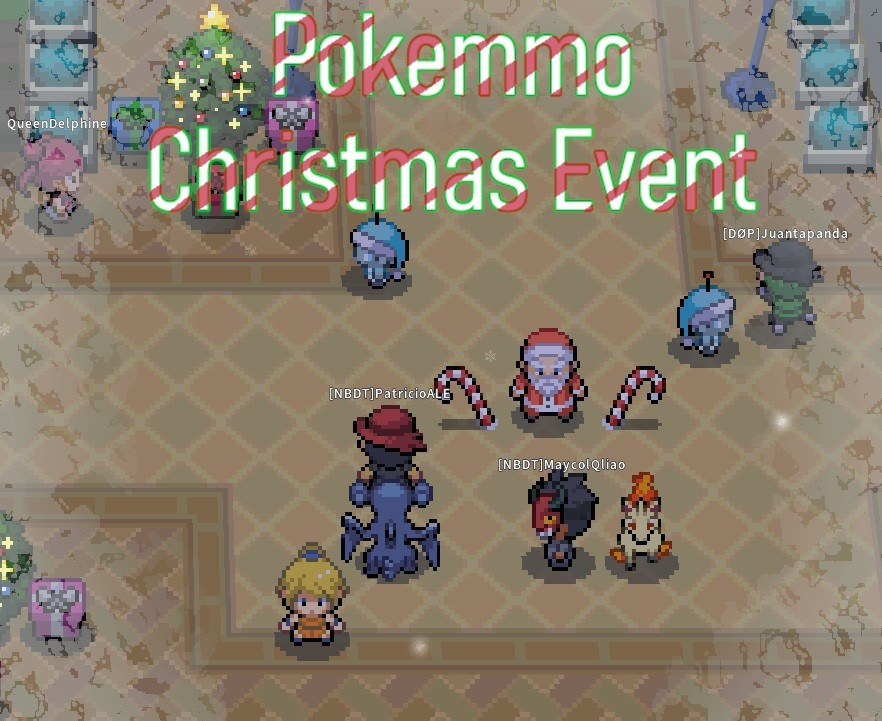
Key points
- Queue up by joining a link and talking to Santa
- Communicate with your team and figure out the best strategy
- Only get into battles that are necessary and that you have an advantage at winning
- Collect Xmas Presents and make money
- Top 50 teams receive a limited hat vanity
- Event ends Jan 5th
How to play
Join a link with 2-4 players, every member of the link must be queued up talking to Santa for the instance to begin.
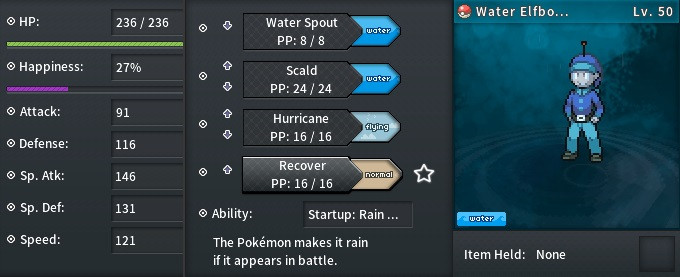
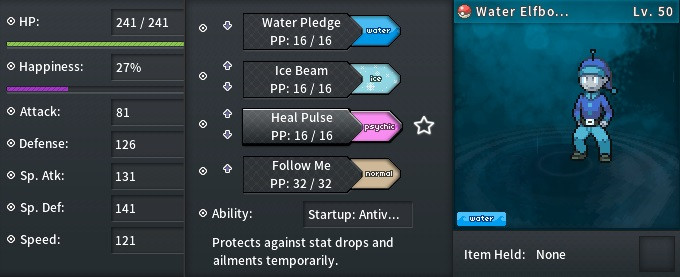
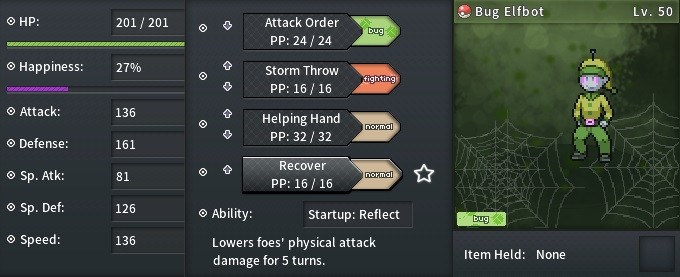
Each member chooses which type of bot they would like to start with, the link leader chooses their type and 2-4 extras to serve as backups. There are 4 free repair kits in the starting area that can be collected. The types of bots you should choose is heavily reliant on the order in which you will face enemy types. The link leader can choose which type you will start against and the enemy types will cycle every round (4 enemy bot kills) according to this list.
Enemy Type		Weakness					Resists

Fire		Water, Ground, Rock				Fire, Grass, Ice, Bug, Steel
Grass		Fire, Ice, Poison, Flying, Bug			Water, Grass, Electric, Ground
Rock		Water, Grass, Fighting, Ground, Steel		Normal, Water, Poison, Flying
Flying		Electric, Ice, Rock				Grass, Fighting, Bug
Steel		Fire, Fighting, Ground				Normal, Grass, Ice, Flying, Psychic, Bug, Rock, Dragon, Steel
Dragon		Ice, Dragon					Fire, Water, Grass, Electric
Water		Grass, Electric					Fire, Water, Ice, Steel
Bug		Fire, Flying, Rock				Grass, Fighting, Ground
Electric	Ground						Electric, Flying, Steel
Ice		Fire, Fighting, Rock, Steel			Ice
Ground		Water, Grass, Ice				Electric Immune
Fighting	Flying, Psychic					Bug, Rock, Dark
Dark		Fighting, Bug					Psychic Immune, Ghost, Dark
Ghost		Ghost, Dark					Normal Immune, Figthing Immune, Poison, Bug
Normal		Fighting					Ghost Immune
Psychic		Bug, Ghost, Dark				Fighting, Psychic
That means if the link leader chooses the starting enemy type Fire then Wave 1 will be Fire, Wave 2 Grass, Wave 3 Rock, up until Psychic when it will cycle back to Fire. The same pattern is present regardless which type is chosen first, it will always follow this list. This information will be invaluable in strategizing your own bot types to counter upcoming waves. If you are near another teammate when a battle begins, you will join them in a double battle.
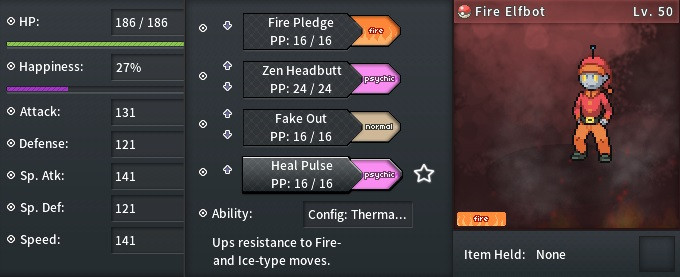
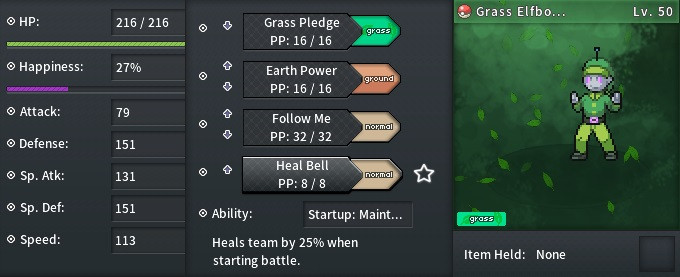
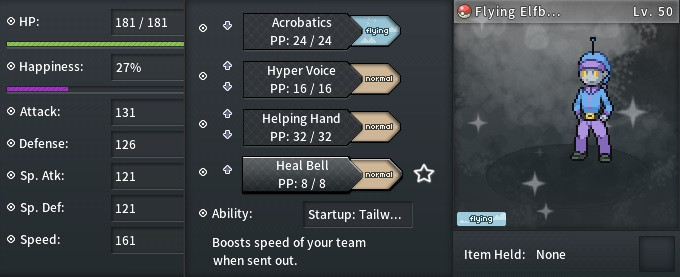
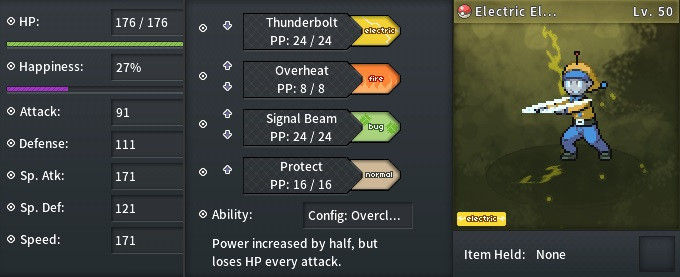
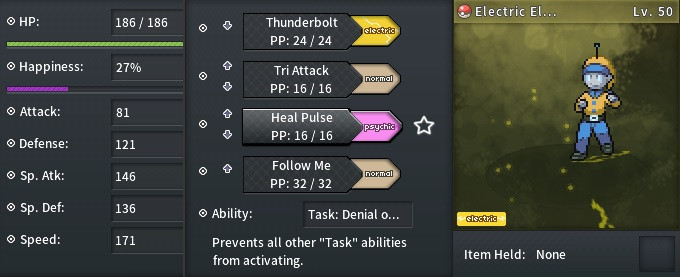
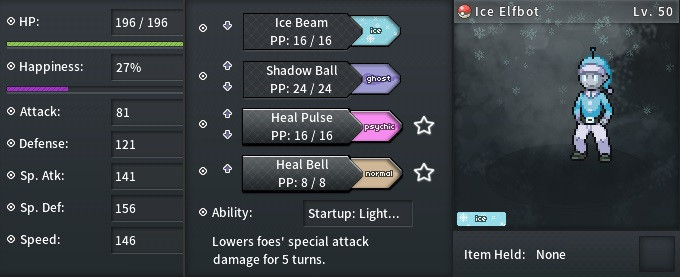
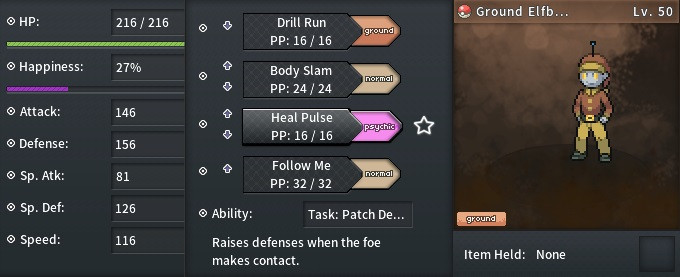
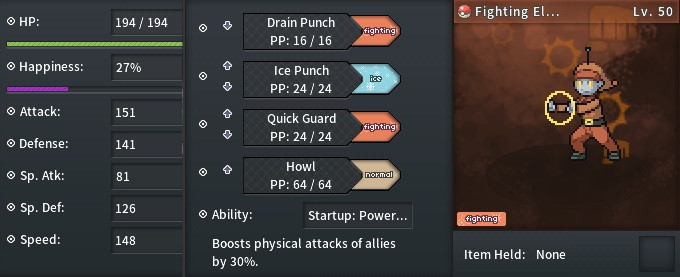
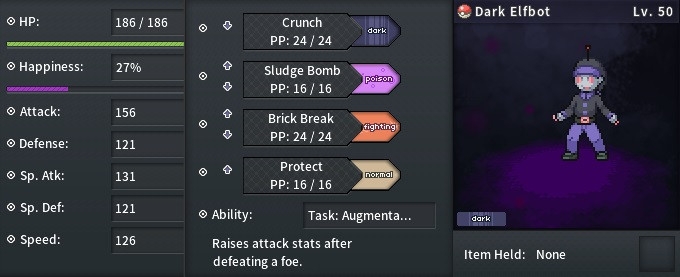
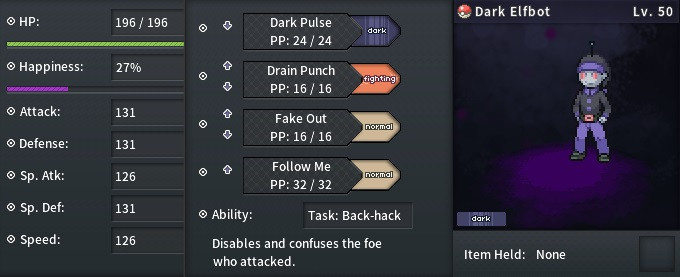
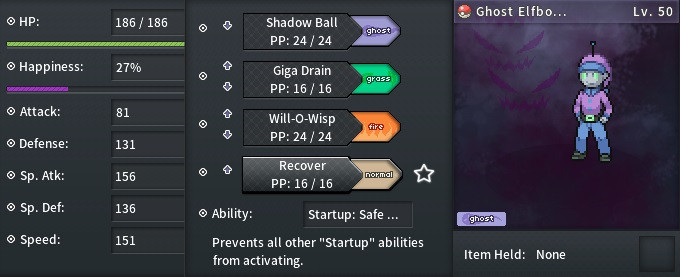
All Bot Stats/Abilities:
SpoilerFire
Offensive
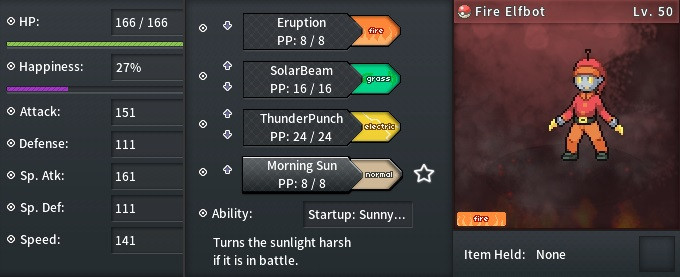
Defensive
Grass
Offensive
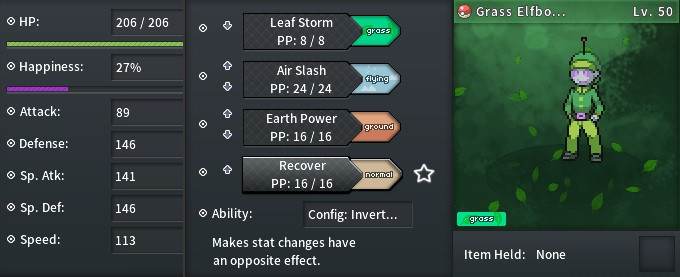
Defensive
Rock
Offensive
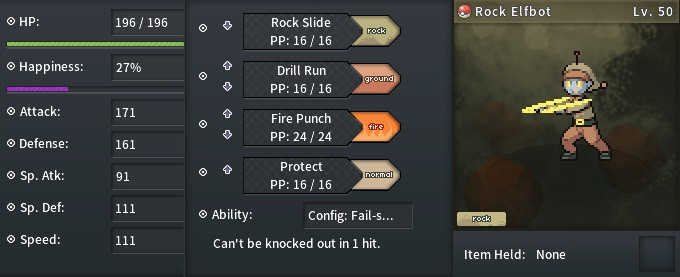
Defensive

Flying
Offensive
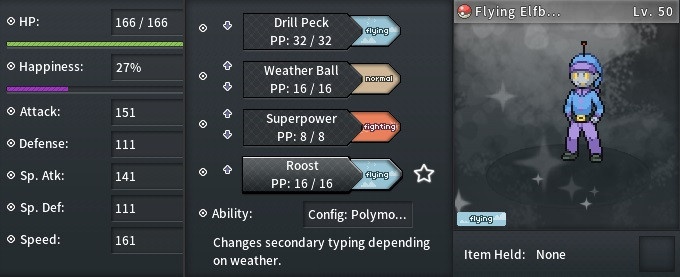
Defensive
Steel
Offensive
Defensive
Dragon
Offensive
Defensive
Water
Offensive
Defensive
Bug
Offensive
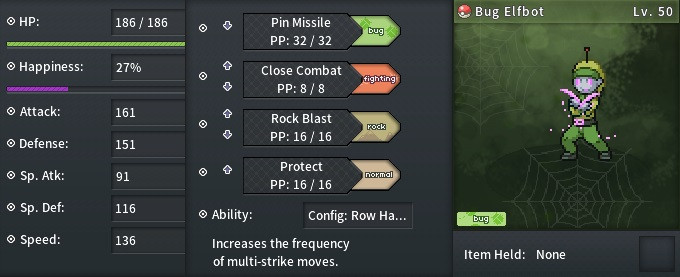
Defensive
Electric
Offensive
Defensive
Ice
Offensive
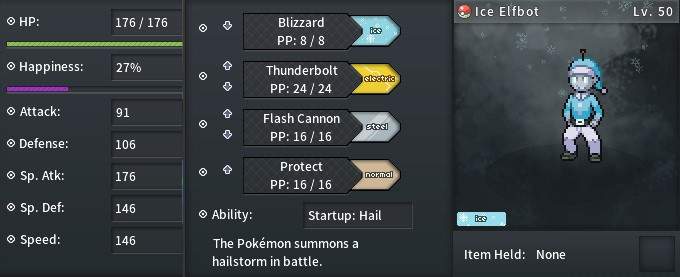
Defensive
Ground
Offensive
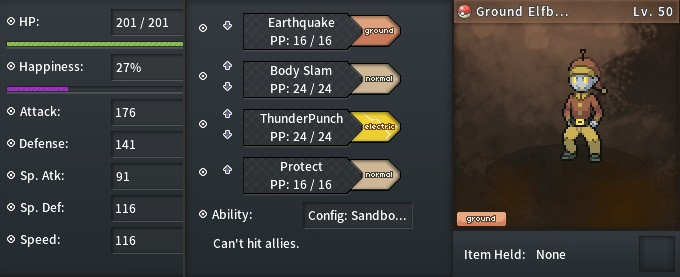
Defensive
Fighting
Offensive
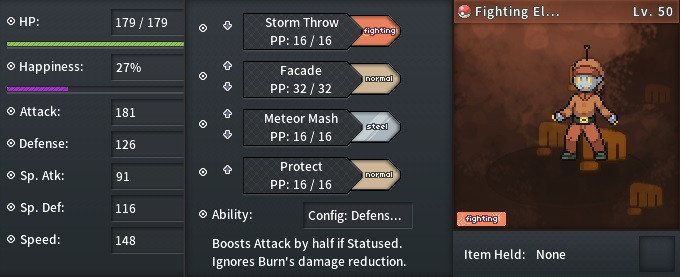
Defensive
Dark
Offensive
Defensive
Ghost
Offensive
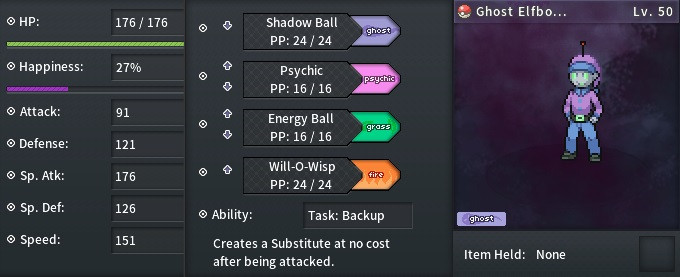
Defensive
Normal
Offensive
Defensive
Psychic
Offensive
Defensive
Bosses
Every 7th round will spawn a boss outside in the middle of the zone. During a boss wave, there are no Elfbots to worry about so you can collect gift boxes freely during this time before you face the boss. More on bosses HERE
Powerups
There are set locations where gifts will randomly spawn. When a wave is cleared, a new box will spawn in one of the empty spawn locations. The only advantage to picking up items before the boss wave (when they are uncontested) would be to gain the potential advantages of the items earlier. Otherwise, you can hold off on hunting them until the boss wave. The boxes contain held items, repair kits, power ups, and spare parts which will add to your backup bot pool. The boxes you collect in the instance don't correlate to the presents you'll get upon completion of the dungeon. It doesn't matter who picks up a box as the whole team shares the same inventory and can use the items freely.
The gifts aren't entirely necessary to progress but they will likely help you last longer overall. If your bot is holding an item at the time it's KO'ed the item will be lost. Most bots have some kind of healing abilities which can be used outside of battle to keep you or your allies healed up, don't forget to use them. Repair kits are a precious commodity that will fully heal your bot and remove any status condition. The Elf Up item will add 5 levels with the benefit of increased stats to a bot. The Recombinator will allow you to pick any nature and EV spread for a bot. The later two power ups would be best used on a fresh bot that will last a long time, not one that's already beat up and out of PP.
Basic Strategy
When the game starts, be sure to ask what type you will be facing first and what's the general strategy for the run. This will determine what type you should start with. Ask if you will be partnering with someone and plan what you will pick together to maximize synergy. For instance, Offensive Fire Offensive Flying go well together as flying will pick up fire typing from sun and its weather ball essentially becomes a stab fire attack that always goes first thanks to flying's superior speed. Defensive Flying can make a good partner for Offensive Dark as dark hits hard but lacks speed which flying's tailwind ability accounts for.
It's not a matter of if, but when your bot will eventually be KO'ed or run out of PP on its moves. The name of the game is making your bot last as long as possible against the infinite waves of enemies, ideally each 1 PP would equal 1 kill. When you're out of PP or KO is imminent, you might as well hit the self destruct button which will deal damage to all enemies before you die. You will respawn back in the starting area and be able to pick another bot from the pool. If there are no bots, you'll have to wait for your team to find a gift box with a robot part in it to complete another bot for you to pilot. You could always go back into the battle area with a drone and help your team find boxes while you wait.
It will be up to trial and error or the experience of your team to figure out the best possible combinations to defeat as many waves possible. Things become significantly harder past the first boss as each enemy will have a randomly typed partner, at this point communication between your team is key so that you can go into each encounter with the best match up possible. Accidentally aggroing groups or rushing into bad type matchups will surely spell an early end for your run. Leaderboard runs can last a long time, up to 8+ hours so prepare yourself accordingly.
Payout
I don't know a lot about all the payouts to this event, but I know you will get at least 4 Xmas Presents for defeating the first boss and 1 more present for each wave after that. The current market value of a present (8k) can rival the efficiency of gym runs if they are sold directly on gtl. The contents of the regular Xmas Present is typically worth 3k-9k even at a vendor, the rarer drops being the Ice Cream Hood (73k) and Ice Cream Clerk Uniform (52k) vanities. Like all limited vanities, their price will rise over time, but don't expect that to happen for at least a few years. The Santa's Present is only obtained from completing the 3rd? boss and beyond and offers increased rewards namely the Winged Helmet (3.8M) vanity. There is a leaderboard keeping track of all high scores you can check at the Elfbot near Santa. The top 50 teams will receive a limited hat vanity. More info HERE
Interesting Notes
If you or someone else defeats a bot near you and it's the last bot of a wave, the new bot will not aggro when you walk in front of it.
If a bot would aggro at the same time another bot is already engaging you, it will stop aggroing after the battle, even if you walk in front of it.
A colored dot on top of the bot's antenna indicates whether it is an offensive (red) or defensive (blue) bot.
Enemy bots are about 20 points slower than equivalent player bots.
-
"Investing" in other words abusing an unessential feature to get around actually playing the game in order to make boatloads of money.
Of all the people calling for this item to be made limited, how many are the new players that you claim are being harmed by this? None. You don't need anymore than 10M at a time in this game to have literally anything you want besides artificially inflated scalped garbage cosmetics or the UNKNOWN OT shinies those scalpers sell on the side.
Hey Mr. Wallstreet, how about you go catch a fucking pokemon in a pokemon game every once in a while?
-
I just did a run where we barely got past the first boss and got 8 presents. Must've only taken 45minutes 8x20k=160k for 45min which is nearly on par with gym runs even as a pretty bad run. Unlike gym runs, there's no 18 hour cooldown, nor is there the requirement to have a team built.
It's not as fun as Halloween, sure. Halloween has a ton of activities for casual players and the pumpking is a separate challenge for the more tryhard players to get the best rewards. This event is almost like all the elements of Halloween rolled into a single dungeon, including the boss fight most players won't like or completely figure out. Keep in mind, they have to balance this event around teams who will min-max everything to perfection, so it's going to feel harder if you and your team aren't doing the same.
If you really don't enjoy it, you don't have to do it. I barely shiny hunt in this game because grinding for hours most likely for nothing isn't fun to me, but it is for others. I just stay away from stuff I don't like and do what I want instead.
-
I agree, same thing in FFXIV with the chocobo theme that played when you mounted. It was cute for about 2 days, then I never wanted to hear it again. Thankfully it's an option in that game to turn it off and just hear whatever environment's music your currently in instead.
I hope the devs don't overlook this just because I've heard staff say they play with sound off anyways. Music is a huge part of the game and immersion. Sure every once in a while listening to external music is nice, but it never feels as immersive as the audio cues from the actual game when you enter a new area or a battle.
-
Not an argument thread, if you would donate for johto leave a comment, otherwise move along.
-
Money for Johto: $100
Money talks, so let's show them how serious we are about Johto!
When Johto is released, I will donate $100 and post a screenshot of the receipt on this thread. Leave a comment with your donation amount if you pledge to do the same.
I will periodically update the number so staff can see how much we want to see Johto in pokemmo!
Only comment if you understand the instructions. This is not a post for arguing what you think about johto or other features, there's plenty of existing threads for that.
-
UPDATED WITH NEW MARKET PRICE INFORMATION 10/19/2022
This guide shows comparisons based on real runs to determine the actual value of Riches Charm(75%) and Riches Charm(100%), and whether they're worth using in your runs.
Find more info about charms at this forum post
Amulet coin is used as the standard of comparison, at this point it is currently valued at $14,000. Here are the items we will be comparing:
Item				Market Value		Boost
Amulet Coin			$14,000			1.5x	payout
Riches Charm(75%)		$39,000			1.75x	payout
Riches Charm(100%)		$90,000			2x	payout
General Equation
This guide was originally written a year ago and prices have since changed. I've figured this equation which can help you determine the least amount your run will need to make before you break even on your charm purchase.
cost*2/rate
where cost is the price of the charm and rate is the rate at which they boost rewards.
Example:
if amulet coin costs 14k your run needs to make 18666 to break even (14000*2/1.5=18666)

if riches(+75%) costs 39k your run needs to make 44571 to break even (39000*2/1.75=44571)

if riches(+100%) costs 90k your run needs to make 90000 to break even (90000*2/2=90000)
On its own, breaking this threshold does not mean that bigger charms are better- as you will see from the results in proceeding sections.
TEST RESULTS
My tests are based on two runs, one where I've gone through the Elite 4 up until the champion, popping the boost just before facing them and then proceeding to clear all Kanto gyms, Hoenn gyms, Morimoto, and two rich trainers afterwards. The other run is identical, only without having faced the Elite 4 champion, supplementing that time instead with more trainers after Morimoto.
The tables below show the result of each run after subtracting the market value of the charm. Below that is listed the percentage gained over other boosts.
Run 1 Elite 4 + Gyms + Morimoto + Trainers
No Boost	Amulet Coin		Riches Charm(75%)		Riches Charm(100%)
$229,892 	$330,838		$363,311			$369,784

							Percent Boost
No Boost	+43.9%			+58%				+60.8%
Amulet Coin				+9.8%				+11.7%
Riches (+75%)								+1.7%
Run 2 Gyms + Morimoto + Trainers
No Boost	Amulet Coin		Riches Charm(75%)		Riches Charm(100%)
$179,684 	$255,526		$275,447			$269,368

							Percent Boost
No Boost	+42.2%			+53.2%				+49.9%
Amulet Coin				+7.7%				+5.4%
Riches (+75%)								-2.2%
Judging from the results, Amulet Coin now serves a niche for newer/casual players who may not be confident in their ability to quickly clear content or who might get distracted mid-run to catch a swarm or alpha. Or, those who can't afford a riches charm to begin with. Otherwise, Amulet Coin is no longer as viable for hardcore runners due to the low price of Riches Charm(75%) However, Riches Charm(100%) has moved from being completely unusable to a mere 1.7% better, but only on a perfectly executed run. Riches Charm(100%) shouldn't be used on anything but your biggest runs, and even then it adds a negligible amount of value.
CONCLUSION
Amulet Coin is most viable for newer/inexperienced/casual runners, otherwise it is nicely outclassed by Riches Charm(75%) Still, Riches Charm(+100%) remains virtually unusable at a puny 1.7% increase on the bigger E4 run and a net loss when compared to Riches Charm(75%) on smaller runs.
-
My Breeding Guide (Updated Nov. 2022)
I have completed over 100 5x31 and 6x31 breeds, now I shall pass my knowledge on to you.

This guide is for newbies and those who still want to further their understanding of breeding. I will be sharing information for beginners, how I conceptualize breeding, and the specific steps I take during the process. For a quick rundown of how breeding works, you can check out The Breeding Guide
Guide Contents
The absolute basics (beginner information)
--- Intro
--- Breeder locations
--- Braces and Everstones
--- Gender and Egg Groups
Now we're cookin (intermediate strategy)
--- Using a breed template
--- The Cost of Breeding
Time to breed (My breeding guide)
--- STEP 1 Make a plan
--- STEP 2 OT
--- STEP 3 Egg moves/Nature
--- STEP 4 IVs
--- STEP 5 Finishing touches
NEW! Regarding Alphas and Hidden Abilities
--- How does Alpha breeding work?
--- What about Hidden Abilities?
The absolute basics (Beginner Information)
SpoilerIntro
Breeding is the easiest way to create a pokemon with your chosen attributes. In order to do this, you must have two parents who possess desired attributes and trade them to a breeder NPC in exchange for an egg. You will lose both parents, but the resulting pokemon will inherit properties from them, namely those IVs or natures which are guaranteed to be passed down by a brace or everstone. If two parents share the same value in an IV, it will be passed down regardless of the item held. If nature is not passed down by an everstone, the child will have a random nature. There's no way to randomly upgrade IVs through breeding, though any egg can potentially turn into a shiny (.000033 chance determined upon egg creation)
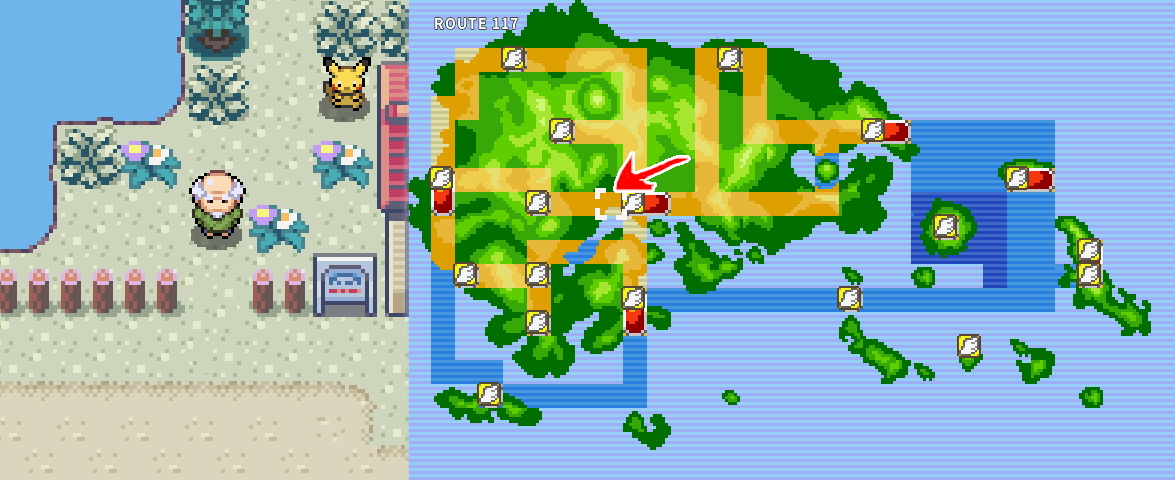
Breeder locations
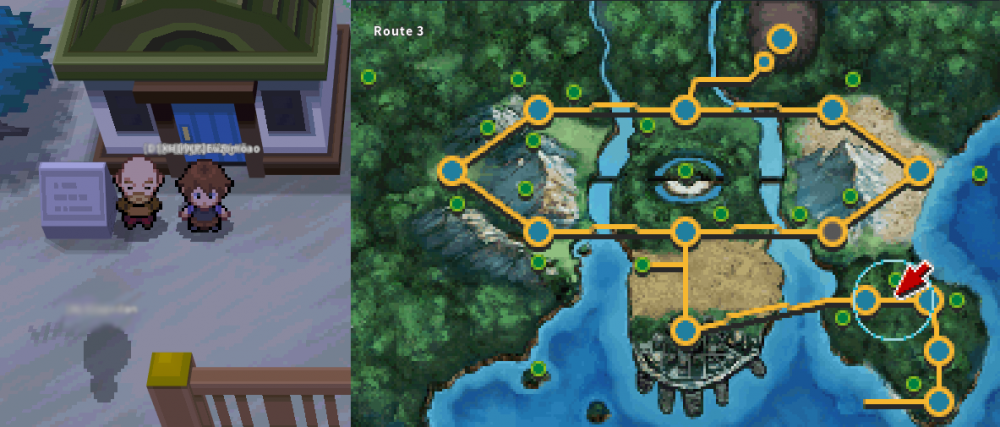
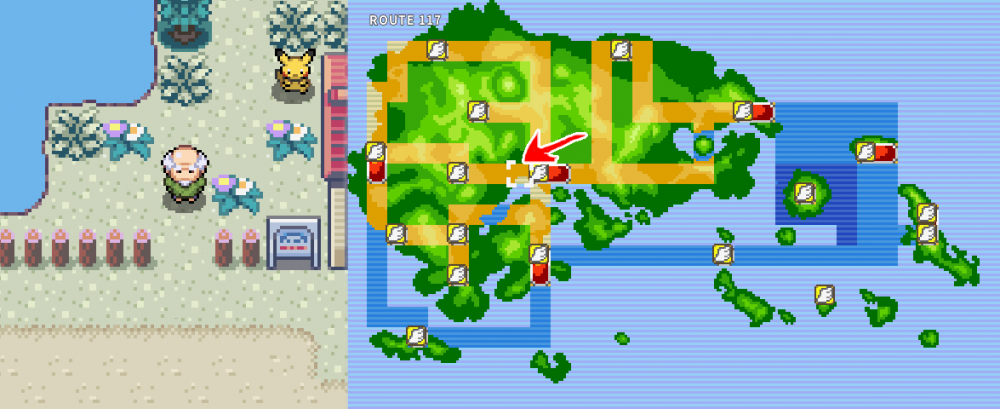
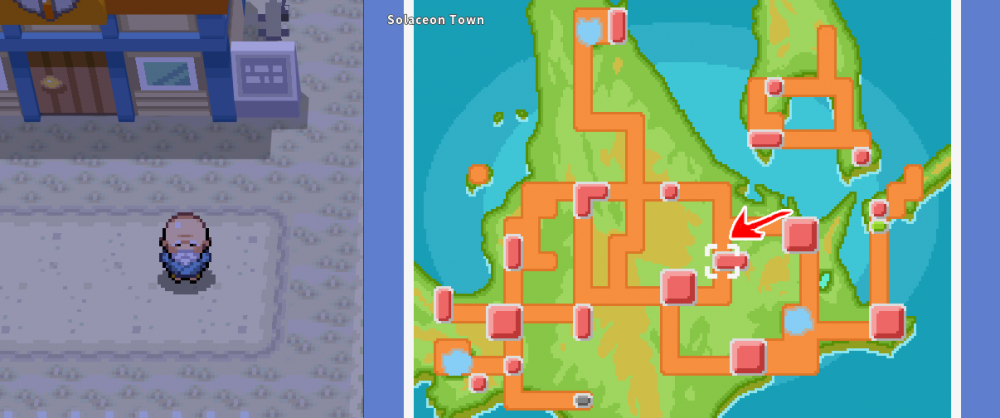
SpoilerBased on which regions you have unlocked/completed, you may or may not have access to a breeder yet. Kanto is the longest wait as the breeder is located on sevii isles post elite 4, and Unova is the earliest being available just after the first gym. The locations will be listed from earliest available to latest.
Unova: Route 3
Hoenn: Route 117
Sinnoh: Solaceon Town
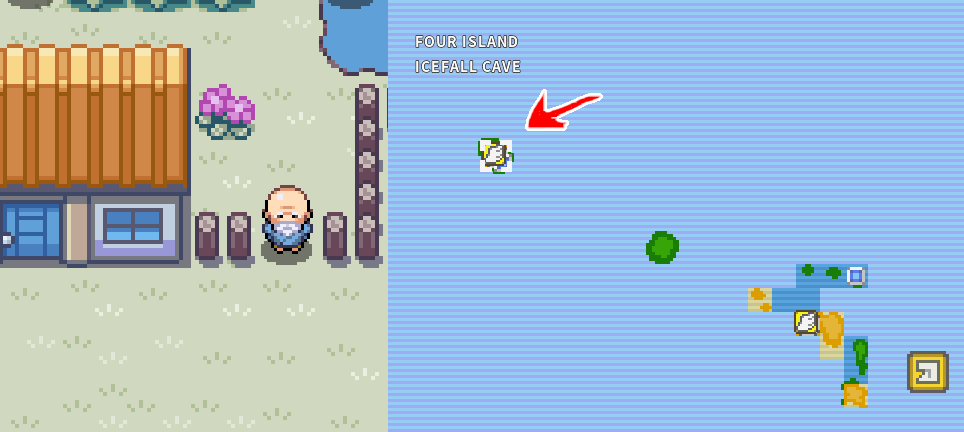
Kanto: Four Island
Braces and Everstones
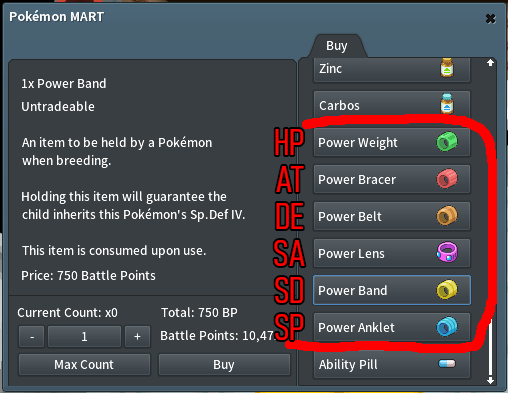
Braces are sold by an NPC at each breeding location for $10,000 or in exchange for 750 battle points at PvP vendor locations. Everstones are found in the wild but more easily purchased for around $5,000 from the gtl. There are six separate braces for each of the six IVs of a pokemon. If a brace is held by a parent during breeding, then the IV indicated by that brace will be passed onto the child. Using an everstone instead will guarantee that the nature of that parent will be passed down. Braces and everstones must be held while they are traded to the breeder and will not be returned.
Egg Groups and Gender
In order to breed, you need a male and female of the same egg group. Let's say you want to breed a ralts, your first instinct might be to breed a bunch of ralts together, but the thing is you don't need to use ralts exclusively. You can use any pokemon within the same egg group(s) along with a female ralts. You can easily sort by egg groups in the PC or gtl on the advanced search page.
Ralts is a chaos and human egg group so it could breed with any pokemon from those two groups, so long as the female is ralts then the resulting egg will hatch into ralts. The female pokemon always determines the species of the egg. Except in the case of genderless mons which only breed with their own species or ditto. There is no way to breed a ditto egg. You could also breed a ralts using only a male ralts and a ditto. When you trade the parents to the breeder, you can choose to pay extra to guarantee a certain gender, enabling you to gender swap and/or chain breed many pokemon into one.
Check this page for information on egg groups, especially useful for chain breeding particles across incompatible groups.
Now we're cookin (Intermediate Strategy)
SpoilerUsing a breed template
Given the information above, it is possible to breed a pokemon with any attributes you want, though it can be rather confusing. To better understand, I use a template which lays out all the pokemon I need to create my final result.
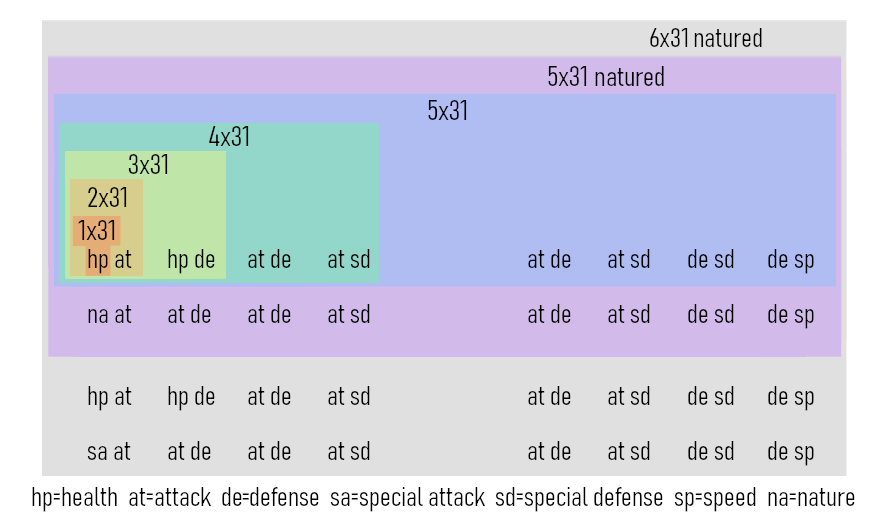
The table represents 64 pokemon each having 1x31 in an IV or the desired nature. They are split into pairs which will breed and then the resulting children will breed in a repeating pattern implied by the symmetry of the table. The contents of each colored box mirrors the next, indicating the breed path, as well as the number of pokemon required for each result. If you can understand this table and use your own template during breeding, the whole process will become much easier.
Let's look at the first row of 8 pokemon (4 pairs) hp at hp de at de at sd breeding the first set of parents (hp at) using braces will result in a single mon with 2x31 health and attack. When we do the same thing with the next pair (hp de), we will end up with another mon with 2x31 health and defense. Since both mons now have 2x31 with one IV in common (health) we can breed those together (assuming we made one male and one female) using braces to hold the two IVs that aren't shared (attack and defense) resulting in a mon with 3x31 health, attack, and defense. We have just turned four 1x31 mons into a 3x31 mon. This pattern repeats with all pairings until all mons have bred together into one final result.
If you still don't understand, here's a finger painting:
Spoiler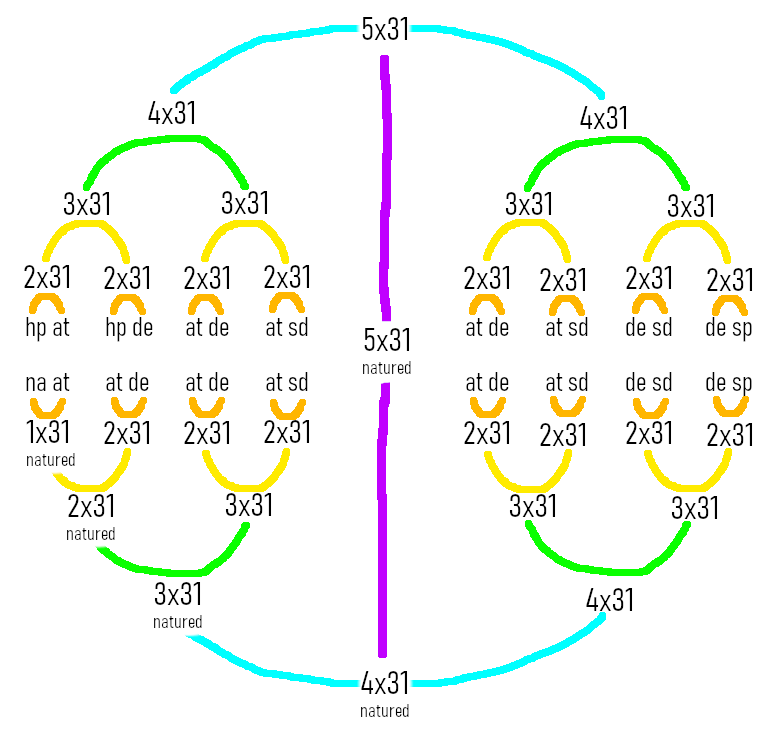
Each colored tier is essentially a breed step, if you spent extra money to ensure the correct gender every time, you could breed every pair at the same time. I prefer to save some money, breeding one half of each future pairing, letting it hatch to check its gender, then paying for the required gender on the latter half. This method causes little hinderance as you can only hatch 5 eggs at a time anyway.
You don't have to use the exact IV pairings I have listed here, they can be easily adjusted so long as you satisfy the shared/ unshared IV principles. If you're already starting with a 3x31 write it down and fit the table around it. Writing out your own breed path in notepad and using it as a template will help maximize your resources while avoiding costly mistakes, I highly recommend it!!
Copy/paste template:
ATTACK 5x31 natured
hp at	hp de	at de	at sd		at de	at sd	de sd	de sp


na at	at de	at de	at sd		at de	at sd	de sd	de sp

SPECIAL ATTACK 5x31 natured
hp de	hp sa	de sa	sa sd		de sa	sa sd	de sd	de sp


na sa	de sa	de sa	sa sd		sa de	sa sd	de sd	de sp
These are two separate tables for either Attack or Special Attack 5x31 natured. 6IV natured is the equivalent of doubling the table and swapping the duplicate nature for the last remaining IV. A 5x31 non natured can be made by using only the top half of the table.
The Cost of Breeding
Breeding probably accounts for the most money a typical player will spend, which makes sense because raising better pokemon is what the game is all about. Each step will cost at least a pokeball ($200) at least $5,000 if selecting gender, and $10,000 per bracer. In order to satisfy a 5x31 natured build, that is at least 570k for bracers, 30k for everstones, 95k for genders, and 6.2k for pokeballs or 701.2k total breeding cost. This is not factoring pre-breed steps for nature and eggmoves, nor does it include money for buying pokemon off gtl, both of which will be common practices that add to the expense. Pokemon with skewed gender ratios will cost a lot more to make female ($21,000) which can significantly increase breeding expenses. I would assess how much money you can afford to spend before breeding and ideally have at least 2-4x that amount before committing to a breed.
There are several tricks to make breeding less damaging to your wallet. You could use BP instead of cash to buy braces, although you could also be making money off the BP instead so it's almost equivalent to spending cash. Only pay for gender on one half of a pair by breeding the first half with random gender, letting it hatch, and then paying for gender on the second half. Some people like to breed a 4xIV first to see if they might get lucky and roll the desired nature, potentially eliminating some steps and saving money. Catching all your own breeders can save money but the viability of this option is questionable given the time you would spend farming vs the current price of breeders on the gtl. The best way to save money is to settle for less, 5IV isn't always necessary and is often overkill. Just making a natured mon with above 15 in it's main stats can be dirt cheap and just as effective for your needs. Competitive mons can get by with 30 in an IV since PvP is scaled to level 50. It's probably best to make an easier breed of a mon and see if you like it before you commit to a perfect IV version. While perfect IVs do grant better stats, those increases don't hold as much weight as a pokemon's base stats, typing, and move pool.
Shopping List
Items needed for a 5x31 natured according to the template I use, amounts will fluctuate based on your own template.

Bracers	57		570k/42,750 BP
HP		x5
AT/SA		x14
DE		x16
SD		x14
SP		x8

Everstones 6		30k
ES		x6

Pokeballs 31 		6.2k

Total 606.2k
Time to breed (My breeding guide)SpoilerThere are many different ways you can complete a breed depending on what you have available. You should customize your own template based on any 2-3IV or natured pokemon you already have. I'm going to outline the way I've bred most of my pokemon which I think is the quickest, easiest, and most efficient way no matter what you have (assuming you have the funds)
NOTE ON HIDDEN ABILITIES: Since this guide was written before hidden abilities were accessible, it doesn't take into account the decision to use them or alpha traits. You should consider the last section of this guide and factor adding hidden ability or alphas into your breeding plan should you wish to use them.
STEP 1 Make a plan
What are you breeding, what are it's IVs and nature, why? Do your research, the pokedex is your friend, search the bulpapedia listing, look at smogon. Whatever you do, make sure you take your time on this step to understand what you're breeding and why you're breeding it.
The first thing I will do is look at the pokedex entry. If you don't have the pokedex entry, you can buy the mon off of the gtl temporarily and sell it back at a slight loss. Check out the base stats, check out its ability, check out its moves, compare it to other popular pokemon. You can check out the PvP statistics menu to see the most popular competitive builds. What ever you decide, there should be some thought behind it. Write out a template so that you can easily review it.
Dragonite 5x31 Adamant | Life Orb | EVs: 150 HP 252 AT 108 SP
Mist
Haze
Extreme Speed
Aqua Jet

Dragon Claw
Fire Punch
Super Power
Dragon Dance
This was a Dragonite I bred recently, the build is based around Dragon Dance + Life Orb. Since Dragonite is relatively slow, he counts on switching into a non threat like chansey and getting off a dragon dance before the opponent can react or after other primary threats have been eliminated. If I wanted to use him as an all out attacker, I probably would've gone jolly + choice scarf giving him more speed than most non choice users while still hitting hard with physical coverage moves or STAB dragon claw. I've given him an EV spread of 150 hp to help him soak a hit while he's dragon dancing and 108 speed which after a dragon dance makes him 1 point faster than jolly Garchomp. The top list of moves are the egg moves I will breed onto him, and the bottom list is my ideal endgame move set.
STEP 2 OT
This step might not be as important to some people, but it's technically the first thing you should do for a new breed. Go out and actually catch the pokemon. If you've never caught the pokemon before, the OT will have an asterisk permanently attached to it and it will be ineligible for trade bonus Exp. It's a small detail that doesn't matter too much, but you might as well get rid of it while you're taking time to make a good breed. Once you have caught just one of that pokemon, you're free to use as many non OT versions as you want without fear of the dreaded asterisk. Note that shiny pokemon OTs work differently, one of the parents must have your OT while the resulting baby is of the same species or else OT will not be transferred.
STEP 3 Egg Moves/Nature
Under the pokedex entry for your mon, go to moves, scroll all the way to the bottom and look at those moves which say EGG. These moves can only be learned by the pokemon through breeding and once your breed is finished, you will never be able to learn them again. There are some exceptions, but those moves will usually say Special and Egg meaning you can buy them from a special tutor later on as well. Breeding egg moves is an optional step in most cases, if you're not going to use any of the moves then you don't have to breed them onto your poke.
I personally like to breed as many egg moves as I can just because you never know what you might want to try out later, plus I feel it adds to the value and prestige of my breed. If a pokemon is born with an egg move, it can always be relearned at tutors just like any other move. Generally, egg moves and TM moves will be passed onto the offspring- so pay attention that your desired moves are not being overwritten during a breed step. Check the summary before you hand over the pokemon and make sure everything is in order, otherwise you can go to the pokemon center and delete intruding moves for $1,000 using the move deleter NPC.
.png.4140c906c1c3d077f7de56e59e820889.png)
These are the egg moves for Dratini and I have decided I want Mist, Haze, Extreme Speed, and Aqua Jet. Notice that Extreme Speed is also available as a special tutor move, so I didn't have to put it as an egg move, but doing so allows me to forget and relearn extreme speed for just 4 heart scales instead of paying 9,000 BP every time. Not all moves are like this, it must say EGG or TM to be transferable during breeding.
By this point in the breeding process, you should have a female version of the mon you're wanting to breed, it doesn't need any IVs or nature yet, in fact it's better if it has neither. Search the bulbapedia listing for the pokemon and scroll down to moves learned through breeding, you may need to check earlier gens for accurate results. This table should show you which pokemon learn the moves you want to breed onto your target. You will have to obtain these pokes and sometimes level them up or even chain breed them with other pokes in order to access the move you want. Again, use the pokedex to figure out at what level the move is learned and either buy or catch one close to that level, train it yourself, or spend heartscales to relearn the move.
For Dratini, I bought the cheapest female on the gtl. Using this table and the pokedex, I determined that both mist and haze are available from Wooper at level 12. So, I scan the gtl ideally for a male Wooper that already knows those two moves, then I breed them together into a female Dratini now with 2/4 egg moves. Extreme speed is from the special tutor so, to learn that, I just need to go and fork over the BP at battle frontier or other similar vendor. Last, I've determined the cheapest way to get aqua jet is through Seel/Dewgong at level 31, and since this is my last egg move I will get a male Seel with adamant nature and use an everstone to simultaneously set me up with the last egg move and nature for the rest of my breed.
If you are not using Egg Moves then you should just breed any male holding an everstone with your desired nature onto your female.
STEP 3 IVs
Now you are set with a female of the desired poke with the desired nature and egg moves. You should now fill out all your breeders, if not you can generally buy them for fairly cheap ~5k each depending. Be careful not to use breeders who can only be female like Petlil or Miltank! Avoid using breeders who hatch into babies like Jigglypuff or Pikachu! Babies won't ruin your breed like female only pokes will, but you will need to feed them berries and level them up before they can breed again. If your breed has multiple egg groups, I highly recommend choosing one or the other for your breeders unless you are extremely careful!
Once I have my breeders, I like to line everything up in my first computer box exactly like my template:
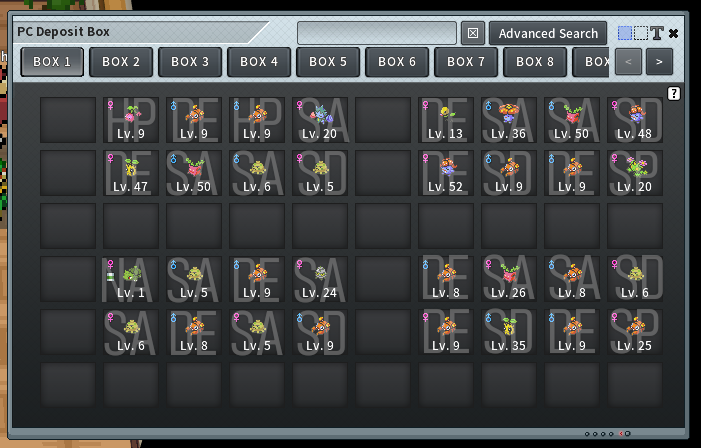
This is for a Venusaur I bred recently, I've overlaid the 31IV of each pokemon in this screenshot to illustrate the connection between your template and the in-game layout. I've found this setup makes breeding incredibly fast and immune to mistakes. When you're all setup and ready to breed, you should have an empty party except for your party lead with flame body or similar ability that will hatch your eggs faster.
Once I have everything lined up like this, and double or triple checked that it matches my template, I will add all the braces and then take them out two couples (4) at a time to start speed breeding. I skip every other couple so that I can save money on genders, meaning I would take out HP DE and DE SA from the top row, have them bred with random gender, and replace the resulting eggs in the same PC spot I took their parents from. Then, I would take DE SA and DE SD from the second row and do the same thing. Once I get to NA SA, I would have to be a little more careful since this is my target species and I need to make sure I'm picking female gender and that my egg moves aren't being overwritten.
Once you have your first set of eggs back in the computer, take out five in reading order (from left to right, top to bottom) into your party and wait for them to hatch. Once these eggs hatch, you can replace them back in their PC slot and start breeding their partners next to them into the opposite gender. This way you save money on genders, hatch 5 eggs at a time, and the layout makes it hard to get lost or forget where you were. Even if you have to go AFK for a while, the order of your party and the layout of the PC should remind you where you were.
Short video showing this breed in action: https://youtu.be/aKdXWjT98pY
Finishing Touches
If your breed turned out to have the wrong ability, you can change it by using an ability pill found at breeding vendors. Normal pokemon can't access their hidden ability unless
On your final breed step, you could pick something other than pokeball when accepting the egg. It's just for looks and can be changed later at anytime, so no worries if you forget.
I also like to make sure I find a nice place for hatching my egg, for example Bulbasaur I hatched in Viridian Forest. Again, not a big deal but I like to customize any detail I can.
The rest is fairly straightforward, train your EVs or use vitamins and wings to fine tune your EVs. If you're using a breed for a clearing a new region, it might be best to use vitamins instead of EV training so that you don't level over the obedience cap.
If you plan on STEP 1 Make a planto 100 right away, you'll want to use hordes with exp share at first and then if it has access to AoE moves, learn one and use it to clear hordes alone which will grant x2 exp compared to exp share. If you have an alt character- you could trade your non asterik OT mon to them and level even faster with trade bonus Exp. Exp charm +100% below level 80 or lucky egg(small) at or above level 80 isn't a bad value if you can afford it.
Upon completing these steps, or utilizing these concepts, you should have a pretty sweet custom pokemon, grats.
Regarding Alphas and Hidden Abilities (Nov. 2022)
SpoilerHow does alpha breeding work?
Alphas are rare pokemon which only occur under certain circumstances, usually alpha hordes which occur once per in-game day. Effectively, the only difference between an Alpha and non-alpha is rarity and aesthetic. Alphas have larger overworld sprites, a red glow, and a special icon in their summary page. They are rarer and will be more expensive to breed due to this scarcity.
Alphas usually have their hidden ability unlocked unless a prismatic pearl has been used to transfer its hidden ability potential to a different pokemon. You don't need alpha to have a hidden ability, and you don't need to use hidden ability on an alpha.
In order to breed an alpha egg, both parents must have the alpha trait. Otherwise, the normal rules of breeding are the same. This means if you want to do a full 5IV alpha breed, every single pokemon used will need to be alpha. Though, since alphas tend to have multiple 31IVs, you will generally need fewer of them but it becomes more complicated to figure out which ones are compatible in creating your desired result.
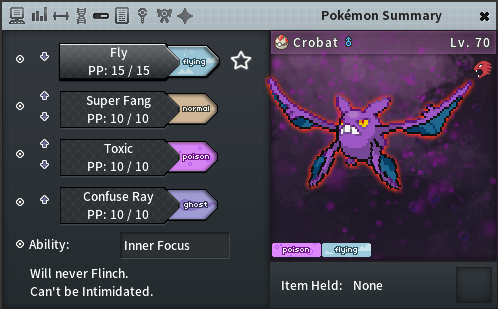
Alpha Crobat with no HA potential (indicated by red alpha icon)
What about Hidden Abilities?
Hidden abilities are much easier to manage than alpha, any one parent must have hidden ability potential and share the same species with the egg in order for it to pass on. This means it's very cheap to simply add into your eggmove or nature step and it will easily carry on to your final result. If you won't use hidden ability, then you don't need to worry about adding it, but even if you don't want the hidden ability- you can still breed your mon with HA potential and use ability pill to change abilities later whenever you want.
HA pokemon are generally only found in alpha swarms, making them technically rarer than non HA versions though their gtl pricing often doesn't reflect that scarcity.
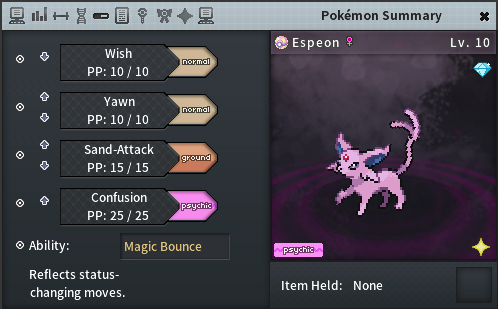
Espeon with HA (indicated by diamond icon)
- Prande, lephantriduc, sherteminys and 1 other
-
 3
3
-
 1
1
-
Preamble on the state of PvE
The key to engaging PvE content is to create a curve which provides the proper challenge and suitable rewards over a range of skill progression. Just starting out- you can smack on some under leveled NPC rebattles for 1 to 5k a piece, God tier- engage in battles which still challenge even the perfect trainer and receive far greater rewards. I believe this is already well done, but also that more variety and excitement is needed. Current PvE runs get stale really fast and with the value of approximately 7 hours worth of flawless runs over 3 days = $10 RP ($2.5M), I don't think anyone can argue against an increase in potential daily rewards.
PvP should be the end boss, the most highly rewarded and incentivized activity, the culmination of everything you've learned throughout the PvE journey, but not everyone will participate in PvP. Just because everyone can run doesn't mean everyone is an olympic runner. It is important to provide a sufficient experience to PvE since this will be the entirety of the game for many players. That being said, here are some propositions which would enhance the PvE experience.
Regional Bosses
An addition of several PvE trainer battles to each region that can be added to a gym run rotation with a cooldown of 18 hours. Think Morimoto and Cynthia in Unova but for every region, enabling more options and variety to the gym run META while creating great moments for all players. At least one of these trainers in each region should be max level and the rest should be structured in a format that require increasingly higher levels of skill to complete.
Hoenn- Birch, Steven, Wally, May/Brendan
Sinnoh- Rowan, Barry, Cheryl, Riley
Unova- Juniper, Bianca, Cheren, N, Moriomoto, Cynthia
Gym Rebattles- Epic
Current gym rebattles can be a bit annoying at times, but for the most part they're too easy once you have a META team built. The current balance is both tedious for those who're prepared and probably way too hard for those who're just a little underprepared- so I think the fights could possibly use a slight nerf with the addition of a hard mode. Epic mode could be as simple as an upscale in level from 80-85 to 100 across the board in exchange for increased payout. In order to preserve the current feel of gym speed runs, the option to toggle hard mode could be added to the NPC at the front of each gym, or as a global toggle in the settings menu rather than to the gym leaders themselves.
Antagonist Hordes
Like swarms of wild pokemon, hordes of antagonists i.e. team rocket, magma, etc would temporarily roam random areas and be challengeable for increased payout/loot. The world would feel much more alive and interesting as team rocket periodically raids cerulean city, a group of ace trainers congregates outside of the pokemon league, or enthusiastic tourists visit nimbasa theme park.
Legendary Encounters
Legendary pokemon appear periodically at lore friendly locations allowing you to challenge alone or enter a queue with other players or link members to team up against it. The battle could be single, doubles, or triples with each player using six, three, or two of their pokemon respectively. If the party is successful in defeating the legendary, they would each be rewarded with massive exp and increased rewards based on the number of players who participated.
Increased PvE rewards
The motivation behind running PvE content is just to make money though perhaps some type of loot or mystery box could be added to spice things up. The act of figuring out your team, your opponents, and tightening up your run is an exciting progression. But once this has been done, there is not much excitement left. You know you will use X team for Y hours and gain Z money. Random rewards in addition to static ones are an easy way to create lasting variation and excitement. Perhaps the current mystery box system should be reworked into tiers like bronze, silver, gold, and platinum. This way we can reinvigorate a wider variety of activities while preserving the easily distinguishable prestige of PvP rewards as the pinnacle.

-
-
The current state of Masterball is inconsistent and counterintuitive. I propose we introduce a tradeable version that can be a rare drop or reward of some kind like the "charms" currently. It's fine if they cost upwards of $500k a piece. It's fine that they are rare and borderline unobtainable, but the state they are in currently just doesn't make sense. If there is a tradeable version, people can actually use these balls for once without the fear they're gone forever. Also, the most desired use for the ball which is to use it on a bred 'mon is now available.
Best case scenario:
You get a wild hair and decide to throw a masterball at the precise moment you happen to be in an encounter with your perfectly IV'd and natured mon. Never gonna happen, not only because this encounter is less likely than aliens visiting earth, but because nobody uses masterball. It's a 1/4 off your account forever, the result being people just never use them.
The practical META:
You accidentally found a wild shiny abra and have nothing to guarantee it won't teleport away. Again, super unlikely but this is accepted as the best use for a masterball. Even still, it's a 1/4 off your account and once you're on your 5th shiny abra, you'd better just start carrying a mean looker as your party lead from now on. Most likely you're going to want to breed that abra at some point or sell it to someone who will, essentially wasting the ball anyways as it can't be used on a bred pokemon, unlike every other ball in the game.
Currently, the mechanics of the rarest most prized ball just don't make sense. It's essentially a high quality bag weight most will either never use or waste intentionally as a joke. I can understand not wanting to give players the ability to have a stock of these 100% catchrate balls, but they could be used as incentive and actually stimulate the economy a bit given that distribution is balanced correctly. Maybe give it a chance to drop from a particular PvP crate that is only obtained through playing Doubles, or UU or whatever happens to be the PvP tier that is most deserted at the time?
-
In no way is this intended to belittle the existing achievements of this game and it's developers. I'm extremely grateful and proud of the job they've done so far, but I felt this post was necessary given the notions I've heard specifically from staff members that Johto is not worth implementing.
To say Johto doesn't add much is to plead ignorance as to why this franchise became legendary in the first place. The setting, the characters, the music, the stories, the emotion- the first five generation games were built from a timeless archetype. These places have a feeling, an atmosphere, they mean something. Yes, it is definitely worth having as much of that as we can get! Otherwise, why not just delete all but one of the regions and inject the missing pokemon into the encounter tables? Why add any of the regions if simply making more pokemon available was the only requirement for viability? If it's just supposed to be an endgame pvp simulator, there are other game formats which already do that better. I would argue that most people don't care about PvP, a two hour story and new land to explore is their endgame.
An MMO is defined by it's vast regions, population, variety/depth of endgame activites, and motivation to participate in the preceding. I think PokeMMO is the best pokemon game running, literally what the vanilla game could be if its developers weren't tasked with selling consoles and overpriced merchandise rather than doing right by the game. Most of us already use a heart gold rom for sprites, meaning Johto is poised as the largest, most readily available, and feasible upgrade to this game. People ask about it all the time for a reason- I know there are a lot of jokes, but most of us actually have a genuine desire to see it implemented. Anything great is worth doing, MMOs require a lot of time invested by the player but they will hesitate to commit to something that feels incomplete. If I were a developer, I would want to finish the foundation before polishing the details, and Johto seems like the last missing piece of that foundation. Judgement upon what people do or do not engage with, what brings them in or retains them, remains obscured so long as the foundation remains unfinished. The first ten years have been extremely successful for this game and here's hoping the next ten push even further towards the realization of it's full potential.
Here are just a few things off the top of my head added by Johto:
- 50+ areas to encounter pokemon
- 11 settlements
- 8 gym leaders
- Trainer tower/Battle Frontier
- Apricorns/Ball Crafting (Heavy Ball, Lure Ball, Friend Ball, Love Ball, Level Ball, Fast Ball, Moon Ball)
- Game Corner
- Safari Zone
- Whirlpool (New Ocarina)
- Lioe, EnviousTurtle27, kidcooly and 3 others
-
6
-
I'm curious as to why/in what scenario this feature is needed or useful?
-
Imagine how lucky you have to be to find a shiny, you'd have to be 10 times that lucky to find one because of a shiny charm (10%)
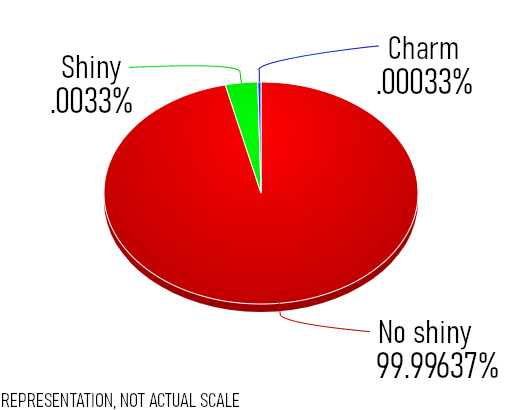
I'm not accusing PokeMMO of intentionally misleading people, rather, being overly optimistic that the average player will bother to seek out the information, let alone understand it. "10%" sounds a whole lot better than "1 in 300,000" while in this case, they are the same thing. People have a natural bias towards what they want or wish to happen, which further skews the misconception that shiny charm is going to make any difference when it most likely will not.
Statistically, if you have a 10% buff running at all times you can safely attribute your 11th shiny to that charm. Think about that, 11 shinies before the charm actually pays out! Let's assume you're incredibly lucky and find one shiny every 8 hours by hunting hordes of 5, it will take 88 charms to satisfy the statistics. The charms themselves are worth 400k, not because of their effectiveness, only because of their rarity. The price is another factor which falsely manipulates someone's bias into believing it's going to make a more than realistic difference.
It's a gimmick, it's for fun, it's not a serious way to increase your shiny rate. Unless you intend on using hundreds of them, at which point I would argue that you have enough time and patience it'd be better to save that money anyways. What's another day or two of hunting compared to the tens of millions you would throw away on charms? I'd estimate you're most likely wasting money on at least a 10:1 ratio by using these charms.
Perhaps it would seem less misleading if the information were included on the charm itself in game, since a lot of people can't or won't tab out and look it up in a browser (mobile users):
Credit to Seth's shiny hunting post
Standard PokeMMO Shiny Rate: 1/30000 or .0033%
Link (+5%): 1/28500 or .0033165% (+1/600000 or +.000165%)
Charm (+10%) : 1/27000 or .00363% (+1/300000 or +.00033%)
Donator + Link (+15%): ~1/25650 or .003795% (+1/200000 or + .000495%)
Donator + Charm (+20%): ~1/24300 or .00396% (+1/150000 or +.00066%)
Due to the uniqueness of shiny hunting as an endgame activity and the unintentional effects these charms have due to a person's natural bias, the game would benefit from making these numbers more clear and readily available to users who might otherwise feel mislead and thus discouraged from further interaction with the game.
TL;DR
Put the actual rate increases on the shiny charm instead of "10%" as it's extremely misleading
Shiny Charm (+.00033%)
----------
Time only consumed while online
----------
A charm which grants an additional 1/300000 chance to encounter a shiny Pokémon.
Stacks with donator status.
Consumed upon use.
Effects last 1 hour.
Link members receive a .000165% bonus.
- sandronejm, Riesz and SweeTforU
-
2
-
1
-
This is my personal route I wrote when sinnoh came out:
You will need fly, surf, cut, defog, and rock smash to complete the route. Repel recommended. Always defog before you encounter Pokémon from the trees in the defog areas or you'll have a bad time.
SpoilerHoney Trees (21 Total)
Fly to Sandgem Town, head south and surf south east, tree on the north side near Pal Park
>Honey Tree Route 221
Fly to Canalave City, head out of town south east, tree is straight ahead
>Honey Tree Route 218
Fly to Floaroma Town, head north west into the meadow, tree is next to the house
>Honey Tree Floaroma Meadow, head back to Floaroma Town then east out of town, tree on the northeast just outside the windworks
>Honey Tree Valley Windworks, turn back west and take the north road, tree is just over the bridge
>Honey Tree Route 205 south, surf on the river north west, tree is by the coast
>Honey Tree Fuego Ironworks
Fly to Eterna City, head west out of town and turn north
>Honey Tree Route 205 north, head west across the bridges and go south along the trees, use cut, tree is along this path
>Honey Tree Eterna Forest exterior
Fly to Oreburgh, head north out of town and up the bike ramp, tree is on the right
>Honey Tree Route 207, head north using cut to get under the bike path, tree is straight ahead
>Honey Tree Route 206
Fly to Hearthome, head south of town and take the west exit, tree is just up to the north
>Honey Tree Route 208, head back and go through the south gate this time, tree immediately on the left
>Honey Tree Route 212 north, head back and go through the east gate this time, across the water bridges tree is on the left
>Honey Tree Route 209, keep following the path north past solaceon, tree is on the right
>Honey Tree Route 210 south, head north east up the stairs and across the bridge, tree is straight ahead
>Honey Tree Route 215, head back the way you came and north this time, cross the tall grass, tree is just inside defog area on the north east
>Honey Tree Route 210 north
Fly to Celestic Town, exit town west, tree is straight ahead
>Honey Tree Route 211 east
Fly to Pastoria City, exit town from the south west, the tree is on ground level in the middle of the marshes
>Honey Tree Route 212 south
Fly to Pastoria City, this time exit from the north east gate heading past the grass and hooking around south, tree is east behind a rock smash
>Honey Tree Route 213, head along the beach east, through the resort, and continue north past the lake entrance, tree is in a fenced area on the left
>Honey Tree Route 214
Fly to Sunyshore City, exit town south west, the tree is immediately north of the gate
>Honey Tree Route 222 -
They could just cut johto kanto off with a roadblock, or make it so there's a loading screen teleporting to fire red kanto when you cross the threshold between them. I don't think they're going to get rid of fire red kanto as it was the original region and it's already working. It'll be a lot easier to build johto on top of what we've got than to redo kanto as well. I actually like that kanto feels old, updating to HGSS would put it at gen4 graphics which doesn't seem right to me. The chief reason given by the devs on why johto isn't added yet is because it adds no new pokemon that aren't already available, which tells me it's even less likely they would want to overhaul kanto in the process of adding johto.
The real reason johto should be added is like all the other regions, they're beloved and many players' first or favorite region/characters/story. In my opinion, one of the best parts of MMO is completing the different regions. The fact you can hold events, hangout, or just visit new places, seeing the sights and sounds, is enough reason to add johto in my book. However, there are several features we are missing without johto, like apricorns and some different types of balls. Why not change some of the encounters in fire red, removing johto mons so as to make them more exclusive to the new region? Make the encounters in kanto more like gen1 kanto and those in johto more like gen 2 johto.
Regardless, I think johto is a big content update that should make it into MMO eventually. It will always feel like something is missing without it.
-
I've beaten all four regions twice and I think the balance is fine. Personally, I would get very bored if every gym leader was monotype without items or coverage moves. If I wanted that kind of experience, I could just play the originals.
If you're healing several rounds in a match, your team is probably under leveled or there's flaws in your strategy. You're not forced to burn items, just lose the fight and grind some levels and/or swap out some different pokemon.
I wouldn't be surprised if the AI does have heightened accuracy as its a simple way to raise difficulty. Even with these crutches, NPC fights are vastly easier than PvP, only a little skill and patience are required to complete the game.
-
Do you like shinies?
Ever felt bothered that something so rare should feel like a burden to carry around?
Excessive weight loss from running back and fourth to the PC?
Hey Trainers! We know that shinies are ultra
rarefair so it's only natural that you'd want to show them off wherever you go, and now you can with the new shiny case!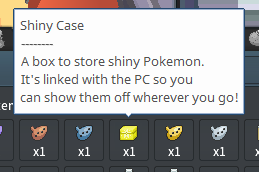
Since shinies are so rare and expensive, it's nearly impossible for average trainers to breed them into something worthy of a coveted slot in their ultra competitive teams. With shiny case, simply drag and drop your shinies into the box to use them anywhere without taking up a slot on your team!
The shiny case makes it so that those coveted pokemon are never too far away for a mad flex on your rivals!
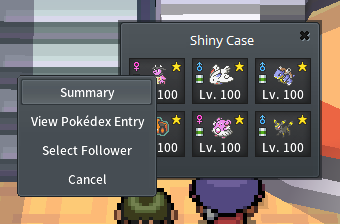
The pokemon will stay in your PC, but by interacting with the case, you can select it as a follower or just stare at its summary BECAUSE WHO WOULDN'T!?
Use the patented chat link feature to show everyone in the world
how lucky you areSRIF™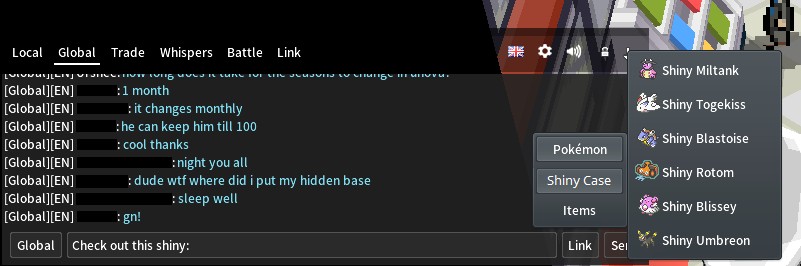
With awesome inventions like this, shinies are sure to be even more sought after than ever before! Never feel burdened again, buy shiny case today!
Fine print: Pokemon stored in shiny case may not be used in battle, nor for HM use outside of battle, all pokemon stored in shiny case may only be used as follower or linked in chat. Shiny case is not liable for any injuries caused directly or indirectly from use of shiny case.
- gabriellegal, profhemlocke, Obvi and 17 others
-
19
-
1


[Theme] Archetype GUI: Chocolate Strawberry Preset
in Client Customization
Posted · Edited by concernedcitizen
Added updates
A tasteful pink darkmode preset for archetype. Requires archetype custom gui (beta) to be installed first download here
This preset will be installed into the archetype folder, overwriting files when necessary.
DOWNLOAD last updated Dec. 5 2022
Changes the default archetype blue theme to pink with several other modifications,
(update)
NOTE: If updating from previous versions, delete your themes\archetype-beta folder and install the latest version of archetype beta before installing this preset
(updates)
Recommended mods:
3DS Monster Icons
HD Item Icons
Complete PokeMMO Follower Sprites
Gen 8 Style Icons is used in screenshots but they are a little too big, blocking chat sometimes, so I went with something else.
I'm currently not using battle sprite mods as they're too buggy for my tastes, but these are the best I found:
HD Battle Sprites
Battle Sprites Reloaded